Navigation
Install the app
How to install the app on iOS
Follow along with the video below to see how to install our site as a web app on your home screen.
Note: This feature may not be available in some browsers.
More options
You are using an out of date browser. It may not display this or other websites correctly.
You should upgrade or use an alternative browser.
You should upgrade or use an alternative browser.
OEM+ DASHCAM BY FITCAMX REVIEW
- Thread starter k1autogx550
- Start date
I haven't seen any specs for limits, but the 256GB card I bought for only $25 double the capacityIs there a maximum size SD card or specs?
- Thread starter
- #43
Good to hear man!@SFLGX - When I open the app, to check the files, the only ones I find are those when the app has been opened.
Install update: I got the top cover installed, finally. Note: it is nothing similar to the mfg instructions/videos. Actually, TITCAMX describes basically how the OEM covers are installed (sliding up the grooves and locking into place). After reading @Runner193 comments I tried working both covers back/forth up/down. I took the bottom cover and lowered it slightly, then positioned the top cover in place while dropping in only one side of the top cover to attach it into the top of the bottom cover, and then tweaked them both back and forth to get the other side of the top cover snapped in. Then, pushing the lower cover back up the half inch onto the windshield metal brackets a bit, then voila! It's locked in place and every joint is smooth and tight!
@SFLGX - So now that everything is snapped into the correct position I'll let the camera do its thing for a couple of days before opening the app and checking the video files. If it's taking videos and storing them then I'm good!
THANKS GUYS!
- Thread starter
- #45
It seem to be doing just fine , how about you guys ?@klautogx550 - How well does that adhesive backing work on the neodymium magnets? Is it strong enough to hold the camera steady in place?
- Thread starter
- #47
Honestly , just try installing with the double side tape that’s came with the camera. I happen to install it on brutal cold day so maybe the adhesive wasn’t sticking as good as it should . But if it doesn’t stick , use the magnet double side tape methodI haven't attached the rear camera yet, so I take that as an affirmative that the magnet adhesive works well.
My rear cam was installed without the magnet method. Installer used a very strong cleaner to prep the spot, and the install was done inside their heated shop.
So far seems to be holding up, including a return trip from Virginia to Colorado..lots of torn up, bumpy sections of interstate, and like -2 or so degrees overnight at a hotel.
I guess the real test will be summer with very high temps inside the car. Hopefully the double sided tape is fully set up by now.
(If I ever find it hanging loose then I’ll use the thick tape used to ‘glue’ my previous small license plate to the front of my ‘22 Sequoia..which was a 3 hr nightmare to remove prior to trade-in!)
Thank you K1autogx550 for the help and videos!
- Thread starter
- #49
That’s awesome man, glad to hear everyone dash cam are installed , now we should just post videos of what we be capturing lolMy rear cam was installed without the magnet method. Installer used a very strong cleaner to prep the spot, and the install was done inside their heated shop.
So far seems to be holding up, including a return trip from Virginia to Colorado..lots of torn up, bumpy sections of interstate, and like -2 or so degrees overnight at a hotel.
I guess the real test will be summer with very high temps inside the car. Hopefully the double sided tape is fully set up by now.
(If I ever find it hanging loose then I’ll use the thick tape used to ‘glue’ my previous small license plate to the front of my ‘22 Sequoia..which was a 3 hr nightmare to remove prior to trade-in!)
Thank you K1autogx550 for the help and videos!
- Thread starter
- #50
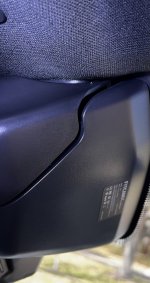
it’s still holding on STRONG@klautogx550 - How well does that adhesive backing work on the neodymium magnets? Is it strong enough to hold the camera steady in place?
Attachments

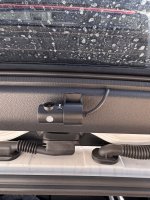
That's good news! Thanks for the photos. It looks like you stuck the washer onto the camera base, and then attached the magnet to the rear door trim?it’s still holding on STRONG
 Wouldn't it be great if some automotive electrical engineer could design a recording system that takes advantage of the feed from the 6+ cameras already present externally on the GX550 and capture it on a readily accessible USB drive? Seems simple enough to me, but then I'm not really cognizant of the issues involved. Tesla does it quite well, so why not Toyota/Lexus?
- Thread starter
- #52
It may look like a washer but it’s just the double side tape from the magnet. Yeah Tesla sentry mode is all that
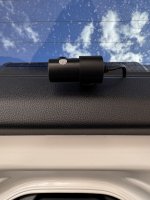
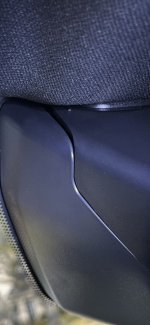
I installed just the front camera and it is working but I just can’t get the back cover of the camera to click in place.
I spent 15 min installing the camera and two hours were not enough for the back cover.
Is there a trick to this?
Your help would be greatly appreciated.
The pictures show the gap between the camera cover and the back cover.
Thanks!
I spent 15 min installing the camera and two hours were not enough for the back cover.
Is there a trick to this?
Your help would be greatly appreciated.
The pictures show the gap between the camera cover and the back cover.
Thanks!
Attachments
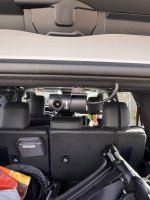
@Zaki6: You are not alone, bro. It is difficult to get that top cover or what you call "the back" on that FITCAMX camera. There is a trick to it. See my comments from the previous page.
The top cover CANNOT and WILL NOT slide down the channel (as described and demonstrated in the FITCAMX install video*), but rather this top cover it has to be held slightly above and then dropped down into the hinge channel towards the rear of the camera (area of RED CIRCLE). Once you understand how they connect, you will also understand that it's nearly impossible to connect these two pieces together if the camera portion is fully installed, because there is no room for that top cover to fit between the headliner and the camera. So you must make some space at that point.
Now, put the camera back into place. Once it's in place, it's a bit tricky, but slightly disengage the camera from the metal brackets on the windshield and slide it down the windshield about 1/2" to make some room for the top cover to fit in place. Another person to hold that camera steady might be helpful, I don't know, because I managed to wrangle this by myself. Then, start on one side to put the top cover tab ears in place, and work it back and forth to get the other. These weren't my ideas, as the comment below by @Runner193 guided me to practice with the camera and top cover removed from the windshield, and trying to rotate or rocking back-and-forth of the top cover on the camera when almost in place.
GOOD LUCK!
*IMO the FITCAMX instructions are describing how the OEM Lexus rearview-mirror base pieces connect together. I don't think anyone at FITCAMX has reality-checked their install documents after publishing them.
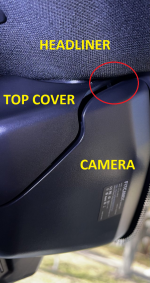
I took one of your photos and labeled the parts. Notice that there are two pieces of the camera assembly; the camera and the top cover. To better understand how these two pieces snap together I suggest that before you try again, remove both pieces from off the windshield and study how these two snap into place. You'll better understand the challenge we've all faced.Install update: I got the top cover installed, finally. Note: it is nothing similar to the mfg instructions/videos. Actually, FITCAMX describes basically how the OEM covers are installed (sliding up the grooves and locking into place). After reading @Runner193 comments I tried working both covers back/forth up/down. I took the bottom cover and lowered it slightly, then positioned the top cover in place while dropping in only one side of the top cover to attach it into the top of the bottom cover, and then tweaked them both back and forth to get the other side of the top cover snapped in. Then, pushing the lower cover back up the half inch onto the windshield metal brackets a bit, voila! It's locked in place and every joint is smooth and tight!
The top cover CANNOT and WILL NOT slide down the channel (as described and demonstrated in the FITCAMX install video*), but rather this top cover it has to be held slightly above and then dropped down into the hinge channel towards the rear of the camera (area of RED CIRCLE). Once you understand how they connect, you will also understand that it's nearly impossible to connect these two pieces together if the camera portion is fully installed, because there is no room for that top cover to fit between the headliner and the camera. So you must make some space at that point.
Now, put the camera back into place. Once it's in place, it's a bit tricky, but slightly disengage the camera from the metal brackets on the windshield and slide it down the windshield about 1/2" to make some room for the top cover to fit in place. Another person to hold that camera steady might be helpful, I don't know, because I managed to wrangle this by myself. Then, start on one side to put the top cover tab ears in place, and work it back and forth to get the other. These weren't my ideas, as the comment below by @Runner193 guided me to practice with the camera and top cover removed from the windshield, and trying to rotate or rocking back-and-forth of the top cover on the camera when almost in place.
It's the connecting of one side, by dropping the camera slightly, then working on the other that allowed me to finally get both pieces secured into place without that nasty gap!I installed my camera the other day. They sent me a camera housing and a cover for that housing (which I did not think was supposed to be included). I used the housing and cover they sent me. I watched the video and it shows the tabs on the cover sliding into the channel on the housing. With the design I received I found the tabs cannot physically slide into that channel. I did find a way they will secure if you place the tabs on the cover near the locking device on the housing and rotating the cover into place. I would have never figured it out without playing with it prior to mounting the camera housing. Good Luck
GOOD LUCK!
*IMO the FITCAMX instructions are describing how the OEM Lexus rearview-mirror base pieces connect together. I don't think anyone at FITCAMX has reality-checked their install documents after publishing them.
Attachments
At this point in the above comment I should have added:t's the connecting of one side, by dropping the camera slightly, then working on the other that allowed me to finally get both pieces secured into place without that nasty gap!
"That once the two tabs on the top cover snap into place on the camera, then slide the entire completed camera assembly back up the 1/2" on the windshield so that those white plastic tabs on the camera lock back into the metal brackets on the windshield. Then you're done!"
P.S. - if you ordered the rear camera option you'll also have to juggle or deal with that rear-camera dangly connection as well because it wants to get in the way. This was my situation. However, after about a dozen attempts, without success, I used @Runner193 suggestions and within a couple attempts I got it ALL into place.
Wow!@Zaki6: You are not alone, bro. It is difficult to get that top cover or what you call "the back" on that FITCAMX camera. There is a trick to it. See my comments from the previous page.
I took one of your photos and labeled the parts. Notice that there are two pieces of the camera assembly; the camera and the top cover. To better understand how these two pieces snap together I suggest that before you try again, remove both pieces from off the windshield and study how these two snap into place. You'll better understand the challenge we've all faced.
The top cover CANNOT and WILL NOT slide down the channel (as described and demonstrated in the FITCAMX install video*), but rather this top cover it has to be held slightly above and then dropped down into the hinge channel towards the rear of the camera (area of RED CIRCLE). Once you understand how they connect, you will also understand that it's nearly impossible to connect these two pieces together if the camera portion is fully installed, because there is no room for that top cover to fit between the headliner and the camera. So you must make some space at that point.
Now, put the camera back into place. Once it's in place, it's a bit tricky, but slightly disengage the camera from the metal brackets on the windshield and slide it down the windshield about 1/2" to make some room for the top cover to fit in place. Another person to hold that camera steady might be helpful, I don't know, because I managed to wrangle this by myself. Then, start on one side to put the top cover tab ears in place, and work it back and forth to get the other. These weren't my ideas, as the comment below by @Runner193 guided me to practice with the camera and top cover removed from the windshield, and trying to rotate or rocking back-and-forth of the top cover on the camera when almost in place.
It's the connecting of one side, by dropping the camera slightly, then working on the other that allowed me to finally get both pieces secured into place without that nasty gap!
GOOD LUCK!
*IMO the FITCAMX instructions are describing how the OEM Lexus rearview-mirror base pieces connect together. I don't think anyone at FITCAMX has reality-checked their install documents after publishing them.
Than you so much for taking the time to explain this!
You are very kind.
Will try and report back.
@Zaki6 Yes, I've found that to be the case as well. For some reason I don't quite understand, the GX550 has to connect to the FITCAMX as WiFi and that action doesn't allow the GX550 to load CarPlay via Bluetooth. However, if you plug your phone in via USB cable you can have both the FITCAMX camera and CarPlay, so that's what I do now.
I also thought that since I didn't renew my vehicle based AT&T WiFi service, that may have been the issue, but no. I renewed that AT&T service and the GX still can't load CarPlay without the USB cord while the camera is functioning. Can someone explain why that is to me?
I also thought that since I didn't renew my vehicle based AT&T WiFi service, that may have been the issue, but no. I renewed that AT&T service and the GX still can't load CarPlay without the USB cord while the camera is functioning. Can someone explain why that is to me?
The GX itself doesn’t need to connect to the Fitcam. The way you access the videos on the Fitcam is via connecting to its wifi network. Your phone also connects to CarPlay wirelessly via wifi. You can only connect to one wifi network at a time.@Zaki6 Yes, I've found that to be the case as well. For some reason I don't quite understand, the GX550 has to connect to the FITCAMX as WiFi and that action doesn't allow the GX550 to load CarPlay via Bluetooth. However, if you plug your phone in via USB cable you can have both the FITCAMX camera and CarPlay, so that's what I do now.
I also thought that since I didn't renew my vehicle based AT&T WiFi service, that may have been the issue, but no. I renewed that AT&T service and the GX still can't load CarPlay without the USB cord while the camera is functioning. Can someone explain why that is to me?
If you aren’t regularly downloading clips, when your car is on go to your wifi settings on your iPhone, click the “i” in the circle next to the fitcam network name and then toggle off auto join. That way it’ll save the password and you can connect when you need to but it won’t auto join and you can go back to using wireless CarPlay.
I explained the same thing on the previous page. OEM+ DASHCAM BY FITCAMX REVIEW
Once again you answered my question and moreover gave me a solution to the problem.@Zaki6 Yes, I've found that to be the case as well. For some reason I don't quite understand, the GX550 has to connect to the FITCAMX as WiFi and that action doesn't allow the GX550 to load CarPlay via Bluetooth. However, if you plug your phone in via USB cable you can have both the FITCAMX camera and CarPlay, so that's what I do now.
I also thought that since I didn't renew my vehicle based AT&T WiFi service, that may have been the issue, but no. I renewed that AT&T service and the GX still can't load CarPlay without the USB cord while the camera is functioning. Can someone explain why that is to me?
I am most grateful


GX550 Forum Photos


GX550 Forum Photos
Similar threads
- Replies
- 1
- Views
- 1K
- Replies
- 18
- Views
- 5K
- Replies
- 10
- Views
- 2K
- Replies
- 0
- Views
- 9K
