FWIW, he emailed me yesterday and showed me a picture of their revised packing. He said mine will ship today, but still no email confirmation. I am not holding my breath. Here is that pic.The best result will be if JWOR crates or double-boxes or whatever it takes to secure the winch tray for shipping from this point forward.
Navigation
Install the app
How to install the app on iOS
Follow along with the video below to see how to install our site as a web app on your home screen.
Note: This feature may not be available in some browsers.
More options
You are using an out of date browser. It may not display this or other websites correctly.
You should upgrade or use an alternative browser.
You should upgrade or use an alternative browser.
🛠️ Member Build Overtrail Upgrades
- Thread starter Bluegill
- Start date
�Member Build
- Thread starter
- #202
That looks great. Mine was clearly dragged and 2 of the corners were ripped clean through. That's not JWOR's fault, though, but a little better prep like you pictured will go a long way.
I got a shipping notification this morning and they previously told me there had been shipping delays to ensure proper packaging. Fingers crossed it survives!FWIW, he emailed me yesterday and showed me a picture of their revised packing. He said mine will ship today, but still no email confirmation. I am not holding my breath. Here is that pic.
View attachment 7320
I did not get a notification. I would think mine must be in the same batch as yours?!? Uggh!I got a shipping notification this morning and they previously told me there had been shipping delays to ensure proper packaging. Fingers crossed it survives!
I got imagine so! Did you double check your spam? I know they're a little behind and I'm sure these western fires and southern snow storms aren't helpingI did not get a notification. I would think mine must be in the same batch as yours?!? Uggh!
 . But also, I'm fine with waiting until our Hero, Bill, continues his DIY picture/instruction series
Yes checked spam too. Agree on waiting on Bill, especially since we have totally taken over his build thread with our first world problems! Sorry!I got imagine so! Did you double check your spam? I know they're a little behind and I'm sure these western fires and southern snow storms aren't helping
- Thread starter
- #207
My damn day job keeps getting in the way!
Haha I hear ya! Same!!!
Dissent's front bumper is about to be released, Lexus GX550 High Clearance Winch Bumper by Dissent Off-road.
Just received email from Dissent:Dissent's front bumper is about to be released, Lexus GX550 High Clearance Winch Bumper by Dissent Off-road.
“Our brand new Lexus GX550 front and rear bumpers are live and ready to order on our website at the links below!”
- Thread starter
- #211
Spent some quality time with the bumper today. Needed to get the wings/outriggers connected to the middle winch tray portion so it's ready to mount to the truck. I thought this would take an hour.....LOL
Pro-tip: Mount the damn wings before you mount the winch and especially before you mount auxiliary lights in the spaces for the lights. It's impossible to get to a wrench on the wing bolts with an auxiliary light in there and it would have been a lot easier to not have the winch mounted too.
There is barely any room to work inside the wings, it's very tight and no way a socket will fit on the forward 2 holes. The way it's supposed to go is the allen-head bolts facing outwards and the nuts on the inside of the "box". I tried to mount the passenger side wing with my 3" Rigid cube light in place so I reversed 2 of the nuts & bolts but I ended up having to take the light out anyway. I removed the driver's side light before starting on the wing and it went much smoother.

Below you can see the cord going to the light on the left and you can see the cooling fins on the back of the light housing. There's just no room to get a socket wrench on those bolts. I tried a long open- & box-end wrench too but you literally can only move the wrench millimeters before you hit the bumper.

The driver's side went much smoother with the light out of the way from the beginning:


Then there are these little doors to screw on after you've finished with the nuts & bolts for the wings and lights. Supposedly these are access holes for your hands but my mitts don't fit in these holes. Fitting these two little doors on with the 6 mini allen-head bolts was tedious and horrible. All 6 holes don't line up. I had to drill out and dremmel open the same hole on each side (the middle bolt-hole closest in to the wing bolts) to get the last bolts in on each side and of course the allen-heads stripped out on each before the bolts were all the way down. Pro-tip: drill out all 6 holes just a bit larger (there's not much material along the edges of the doors to go larger) before you start the installation so you have some room to move the little door around a bit. Or just leave the damn things off. These little bolts and super-high tolerance fitments just don't work on a big steel bumper like this. That shit never lines up right.


Then I tightened down the actual winch mounting bolts and reinstalled the nice lower cover. It has slots and a very subtle JW in with the slots. One reason I like this bumper is that it doesn't have cheesy and flashy manufacturer logos and wings and lighting bolts and crap like that all over it.


Then I connected the solenoid to the top of the winch and connected the wires. I'm really hoping that this bumper fits up under the truck with this solenoid mounted front & center. If it doesn't, it's going to be a major pain in the ass to relocate it, get wire extensions if needed, etc. If I take apart the front end of the GX and then the solenoid doesn't fit, I'll have to abort and come up with a new plan.

Now it's time to strip the front off the GX and jack this whole monstrosity up into place. I'll see if my back is up to it tomorrow - I kind of doubt it will be, although I am self-medicating this evening with many 805s.


Pro-tip: Mount the damn wings before you mount the winch and especially before you mount auxiliary lights in the spaces for the lights. It's impossible to get to a wrench on the wing bolts with an auxiliary light in there and it would have been a lot easier to not have the winch mounted too.
There is barely any room to work inside the wings, it's very tight and no way a socket will fit on the forward 2 holes. The way it's supposed to go is the allen-head bolts facing outwards and the nuts on the inside of the "box". I tried to mount the passenger side wing with my 3" Rigid cube light in place so I reversed 2 of the nuts & bolts but I ended up having to take the light out anyway. I removed the driver's side light before starting on the wing and it went much smoother.
Below you can see the cord going to the light on the left and you can see the cooling fins on the back of the light housing. There's just no room to get a socket wrench on those bolts. I tried a long open- & box-end wrench too but you literally can only move the wrench millimeters before you hit the bumper.
The driver's side went much smoother with the light out of the way from the beginning:
Then there are these little doors to screw on after you've finished with the nuts & bolts for the wings and lights. Supposedly these are access holes for your hands but my mitts don't fit in these holes. Fitting these two little doors on with the 6 mini allen-head bolts was tedious and horrible. All 6 holes don't line up. I had to drill out and dremmel open the same hole on each side (the middle bolt-hole closest in to the wing bolts) to get the last bolts in on each side and of course the allen-heads stripped out on each before the bolts were all the way down. Pro-tip: drill out all 6 holes just a bit larger (there's not much material along the edges of the doors to go larger) before you start the installation so you have some room to move the little door around a bit. Or just leave the damn things off. These little bolts and super-high tolerance fitments just don't work on a big steel bumper like this. That shit never lines up right.
Then I tightened down the actual winch mounting bolts and reinstalled the nice lower cover. It has slots and a very subtle JW in with the slots. One reason I like this bumper is that it doesn't have cheesy and flashy manufacturer logos and wings and lighting bolts and crap like that all over it.
Then I connected the solenoid to the top of the winch and connected the wires. I'm really hoping that this bumper fits up under the truck with this solenoid mounted front & center. If it doesn't, it's going to be a major pain in the ass to relocate it, get wire extensions if needed, etc. If I take apart the front end of the GX and then the solenoid doesn't fit, I'll have to abort and come up with a new plan.
Now it's time to strip the front off the GX and jack this whole monstrosity up into place. I'll see if my back is up to it tomorrow - I kind of doubt it will be, although I am self-medicating this evening with many 805s.
Last edited:
Nice unit but I hope you didn't mount it yet. The bolts in this image and others are too short for the nyloc nuts and do not extend beyond the nylon insert. Unless you put Loctite on the threads the nuts may fall off from vibration as the locking function of the nylon inserts is minimal.

- Thread starter
- #214
You know, I noticed that too and I didn't like it. I don't think they are going to vibrate loose and the wings are going to fall off, but I'm going to remove 1 and see what I can do about it. I was planning on removing and reversing those 2 in the photo you re-posted that I installed backwards anyway. The button-heads should all be facing outwards.
- Thread starter
- #215
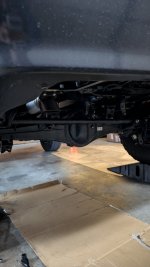
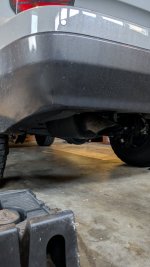
See below. I removed the washer under the button-head and this gave up enough length for nearly 2 full threads to push through the nylon. The button-head has enough surface area to not require a washer and I'm certainly not worried about the button-head punching through the material. Anther problem this solves is the fact that on the forward-most top bolt, the washer was hitting the weld and not sitting flat (on both wings). See the white arrow where the washer hits the weld and the red arrow points to the gap. This was really on my mind last night because those 2 bolts on the 2 wings were even shorter due to the gap and the threads were no where near engaging the nylon on the nuts.


I do a lot of welding and I like the quality of their welds done by a skilled welder.
Great work and great pics as always! I just unboxed mine today and I think I'm just going to get stuff laid out and my winch clocked. I did get the Prinsu rack on with an OnX6+ on top and NYTOP's axle dump exhaust installed and it sounds GREAT. I'd say it looks great too, but the whole point is it's hidden!See below. I removed the washer under the button-head and this gave up enough length for nearly 2 full threads to push through the nylon. The button-head has enough surface area to not require a washer and I'm certainly not worried about the button-head punching through the material. Anther problem this solves is the fact that on the forward-most top bolt, the washer was hitting the weld and not sitting flat (on both wings). See the white arrow where the washer hits the weld and the red arrow points to the gap. This was really on my mind last night because those 2 bolts on the 2 wings were even shorter due to the gap and the threads were no where near engaging the nylon on the nuts.
View attachment 7715
View attachment 7716
View attachment 7717
Attachments


- Thread starter
- #218
Man, you splurged for that titanium axle dump? What is that, like $700? I like the way you roll!
- Thread starter
- #219
I hope I don't sound to bitchy in my posts....I've very happy with the bumper thus far. It's definitely a quality item. It's just tedious getting it all together (and directions would have been nice). The last one I did was on my Land Rover LR4 and that was a real PIA. All Land Rover bolt holes seem to vary by a good bit and nothing ever lines up right. Disassembly is also an absolute illogical nightmare. Still, for this GX bumper, I really wish I had a shop and the whole bumper assembly was up on a work table. And soon I'm going to really wish that I had a vehicle lift.I do a lot of welding and I like the quality of their welds done by a skilled welder.
I just got back from the hardware store where I figured this was a good excuse to get a set of stubby ratcheting wrenches. My ratcheting set is all long wrenches and they only go up to 18mm while the big nuts for the wings are 19mm / 3/4". As a bonus the Girl Scouts were out in front of Ace and now I'm really set up.
I've been waiting to see Dissents gear for the GX. Front bumper takes the next step of commitment and cuts out some plastic and uses the fog and corner light space. I think it looks great. Nice job Dissent team.Just received email from Dissent:
“Our brand new Lexus GX550 front and rear bumpers are live and ready to order on our website at the links below!”
Attachments
GX550 Forum Photos


GX550 Forum Photos
Similar threads
- Replies
- 8
- Views
- 2K
- Replies
- 3
- Views
- 2K
- Replies
- 18
- Views
- 2K
