🛠️ Member Build Overtrail Upgrades

�Member Build
Yes, I received 2 emails for the 2 shipments.

I've had a few emails back & forth with them and I was told it would ship early November. Then it was supposed to ship right when I left for Mexico during Thanksgiving week so I asked them to hold off until December 4th. Then I didn't hear anything so I texted them a few times and finally called them last Wednesday or Thursday and left a message asking for them to just give me a hard date so I can plan accordingly. I got a text back the next morning and then the shipping emails. I completely understand the delays and I was nowhere near "pissed-off mode" yet, I just wanted to be able to plan on setting aside time from work to install the bumper & winch. Looks like I'll have time now over the Christmas & New Year holidays.

The shopify emails that I received very clearly reference JW Offroad:

jwoffroad<store+10386505783@t.shopifyemail.com>
Fri 12/20/2024 3:07 PM

jwoffroad
Order #68**​
I came back to this forum looking for just this info! Sad day for me because they promised mine before Christmas too 😅. Hopefully by New Years, I know package delivery gets crazy this time of year!
 
I came back to this forum looking for just this info! Sad day for me because they promised mine before Christmas too 😅. Hopefully by New Years, I know package delivery gets crazy this time of year!
They emailed me yesterday and said something about parts missing during powder coating and that was the delay. He said the next batch including mine ships out Thursday.
 
Don't feel bad....my tracking info shows:

UPS doesn’t have possession of the package yet.

LOL....I'll be patient!
 
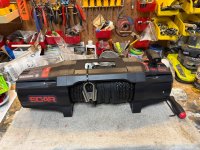
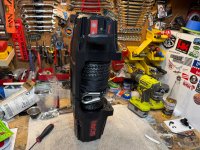
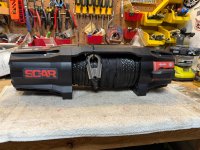
Still waiting on my bumper (they created the labels on Dec 20th but UPS still doesn't have the packages). So, I decided to clock my winch since it's been sitting on my workbench for weeks now.

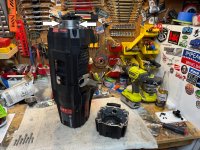
Very simple process, all you're doing is rotating the endcap with the clutch lever 90-degrees so the lever moves from the top of the winch body to the front. On my new bumper, there is an access hole on the front face of the bumper to reach in and work the clutch lever.

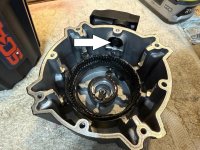
Switching to free spool simply disengages the clutch mechanism from the gear train so the drum can spin freely, then engaging the mechanism locks the drum back to the gear train. You can see in the pictures below where the clutch lever retracts in the free spool setting and pulls the clutch rod out of the holes in the drive gear.

I just needed to remove the small allen-head bolts holding gearbox housing to the end of the winch body, pull off the gearbox housing, rotate it 90-degrees so the clutch lever is facing forward, and put it back on and secure the bolts.

1.jpg

2.jpg

you can see that there are two places for the clutch to engage the drive gear so you can have the clutch lever on top of on the front of the winch:
3.jpg

Here is the clutch pulled back in the free spool setting so it's not engaging the drive gear:
4.jpg

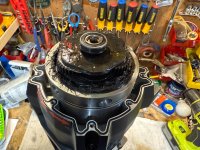
you can see the bearing on top and the 1st planetary gear set:
5.jpg

6.jpg

I had to slice the engage/free spool sticker because it spanned the joint between the gearbox housing and the winch body. Then I glued the short piece of the sticker back on the winch body in it's new location:
7.jpg

All ready to go....just need a bumper to put it in.....
 
Last edited:
Still waiting on the JW Offroad bumper.....we are texting back & forth now and on Thursday he was looking into it. Sounds like he may have overpromised a bit.

Had a chance to set up the new Hele Box Duo sleeping platform. Here's a link:

Car Camping Platform

It does what it says...I'm actually very pleased with the overall size of the platform and the space available in the back of the truck with the front seats in normal driving positions.. I'm 5'10" on a good day and I have plenty of length to stretch out. The platform is 72" x 40". There is also plenty of room above so you don't feel like you're in a coffin. The rear hatch closes fine. It's a really nice atmosphere inside the truck with all doors closed, and also very nice with just the rear hatch glass popped open. That's going to prove to be a nice feature while sleeping in the truck. Need to create a way to open & close that glass hatch from the inside.

I was a bit worried when I received the platform and opened up the box - the very nice carry bag is really big and heavy at 36 lbs. I was wondering if this will be too much of an extravagant pain in the ass for camping. The wood platform is obviously the majority of the weight. Would be cool to recreate the wood portion in aluminum...would save weight and bulk too. I might have to look into that.

Setup was OK, simple but a bit tedious. The long bars connecting the front-to-middle-to-back cross pieces are simple snap-button into place. But the legs don't snap into place, you insert them into holders on the frame and then tighten an allen-head bolt to snug the legs in place. I suppose it makes it all more rigid but its takes some time and attention. I'll see how much I have to tear it down to pack it up but I suppose I'll have to take every piece apart. I'm wondering if it would be best to leave the frame together and just stash it in the garage and throw it up on the roof rack when it's time to camp. I hate wasting good beer-drinking camping time setting up tedious shit.

My sleeping pad is new too. I splurged for the Exped LuxeMat Duo in medium double size. It's perfectly sized, nearly identical to Hele Duo at 72" x 40.9" x 4" thick. I slept on it (on the ground) the other weekend camping and it was oh so nice. Here's a link:

https://www.rei.com/product/228557/exped-luxemat-duo-sleeping-pad?redirect-pup=false

I had a 20% off coupon and a $50 gift card and some REI bucks so it softened the blow.

Hele labels the front, middle and rear/trunk cross pieces. The "front" piece has horizontal pole extensions, I suppose to get the platform length out to a full 6 feet. I found that the front piece sticks too far forward and it was rubbing on my front seat backs (again, seats are in normal driving positions). See the photos. So I just swapped the front cross piece for the rear. The rear doesn't have the longer horizontal protrusions so the rear in the front position saves space behind the seat backs.

The legs have a lot of adjustability. They use the simple snap-button method and you just extend them until they are in the right place. The longer legs go in front so they can hit the rear passenger floor. Works great. The middle and rear legs are shorties and the middle legs just barely touch the little dip behind the rear seats when they are fully extended. The rear legs just adjust to wherever they're needed. A big part of the tedious setup process was adjusting the legs - now that that's done, I won't need to do it again. I'll mark the proper hole level on each leg with a paint pen just in case they get moved in the bag. Hele also includes 2 extra shortie legs so you can use the platform in another setting with it flat on the ground like a cot.

There are little rubber sections on a few of the wood platform slats that face up to grab your sleeping pad. Nice touch. This setup is very comfortable and actually quite perfect. If you're over 6-feet tall then you may have some length issues. My kids loved it. The neighbors were walking their new baby and their 2-year-old was riding his balance bike and the 2-year old jumped in the truck. His Dad walked back to his house a few doors down and brought back some cocktails, the kids moved to the trampoline in the backyard, and they ended up staying over for a couple hours. My wife held their baby the whole time and now I'm on the hook for another kid. If she goes camping with me in the back of this truck then she'll definitely get pregnant again. Lexus is really bringing the world together with this GX. May be a December to remember.

Time will tell how well it works for real world camping. We'll see how tedious the setup is out in the field. Or do I set up the rear portion only and install it in the truck and then load all my cargo under and on top of it? I think it would take up too much cargo space back there partially set up. And I don't want to lug my cooler up on top of it. If it's only 2 people camping then I could set up the whole thing and load cargo on it....BUT, the passenger seat can't go back too far before it hits the platform. When I'm a passenger with no one in the back seat, I like to put the seat all the way back and recline like a gangster. My buddies do too. We will see how it works out.

Here're some pictures because I'm all about the pictures:

View attachment 6153

View attachment 6154

View attachment 6155

View attachment 6156

View attachment 6157

The white arrow in the photo below is the allen-head bolt that clamps down to secure each of the 6 legs in place. The red arrow is the same allen bolt system that keeps the front, middle, and rear cross pieces held together but the red arrow bolts come pre-assembled and don't need to be taken apart. Two of the allen bolts and nuts had come loose in the bag during transport - you can see one set below on the instruction book. The silver collar on the black tube is there as a back-stop for the wood slats that secure at each end of the platform.
View attachment 6158

My 6-year-old wonders what the hell I'm doing now.
View attachment 6159

Circled in red is the horizontal extension on the front piece - it's too close to the front seat backs.
View attachment 6160

So I just swapped the front piece for the rear piece. You can't just turn the whole platform around because the middle section is not actually in the exact middle - the poles between the rear-to-middle are a bit shorter than the poles between the middle-to-front. This keeps the middle legs in the cargo area.
View attachment 6161

Now the longer front piece is in the rear. It still clears the rear cargo door with inches to spare.
View attachment 6162

View attachment 6163

View attachment 6164

View attachment 6165

View attachment 6166

View attachment 6167

View attachment 6168

View attachment 6169

View attachment 6170
LOL....I just realized you can see my buddy Tyler through the rear quarter window walking back with cocktails.
Have you run any trials with this? Wondering about the amount of rattle or lack thereof.
 
I won't leave the sleeping platform set up while driving. I'll set it up at camp. I fill up the entire back of the truck with cooler, wood, Pelican cases, misc. camping gear, etc.
 
Finally got around to installing Sherpa roof rack with window panels. Added Baja OnX6 amber light bar wired to Garmin PowerSwitch. Works pretty well from the phone and CarPlay app. Skids and slides from NYTop coming up as soon as I get them.
IMG_2448.jpeg
 

Attachments

  • IMG_2452.jpeg
    IMG_2452.jpeg
    288.4 KB · Views: 39
  • IMG_2453.jpeg
    IMG_2453.jpeg
    374.9 KB · Views: 36
  • IMG_2454.jpeg
    IMG_2454.jpeg
    347.2 KB · Views: 31
Finally got around to installing Sherpa roof rack with window panels. Added Baja OnX6 amber light bar wired to Garmin PowerSwitch. Works pretty well from the phone and CarPlay app. Skids and slides from NYTop coming up as soon as I get them.View attachment 6695
Very cleanly done, I noticed there seems to be enough space for a second battery in the battery bay, anyone considering this for running a fridge, charging from solar or just topping from starter battery?
 
Back
Top